Drop 2 Voicings for Prelude To A Kiss

Recently I recorded a Willie Answers lesson on diminished harmony. Part of that lesson was using a diminished approach technique which I discuss in depth in the lesson. I also covered drop 2 voicings which generated some questions from our students. So, I figured let’s do an article to explain the concept!
In this article, I am using Duke Ellington’s Prelude To A Kiss to demonstrate drop 2 voicing techniques.
The Melody
Let’s start with the melody. In example 1, you’ll find the melody of the first 4-measures of the song.
Voicing Down From The Melody
Next, we “voice down” from each melody note with a four-note chord.
Let me explain what voice down means. Notice the first chord is D7 with the notes: C-E-F#-B. These notes break down as follows:
- C = the 7th of the chord
- E = the 9th of the chord
- F# = the 3rd of the chord, and
- B = the 13th and is also the melody
So, to “voice down” means that we are creating a chord voicing down from our melody note. The melody note should remain the top note while we ‘fill in’ chord tones and tensions beneath the melody. If you need help creating block chords, check out my article on Creating Seventh Chords.
TIP: when we refer to voicings or voicing a chord, we are referring to how the notes of the chords are arranged.
Placement
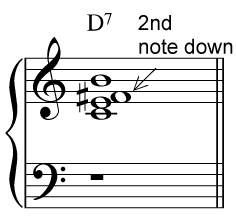
Now that we have our melody voiced with 4-note chords, we can proceed with our drop 2 technique. In example 3, I have isolated the first D7 chord:
If we were to number the notes of the chord, starting with the melody note and working down, we have B = 1, F# = 2, E = 3, C = 4.
IMPORTANT: at this point you might be thinking “Wait a minute! I thought B was the 13th and F# was the 3rd?” Yes, B is the 13th of the chord. However, when thinking of the placement of the note B, it is the top note of the chord or note #1. Another way to look at it is like this:
#1
#2
#3
#4
Or,
B = #1 (the top note)
F# = #2 (the second note down)
E = #3 (third note down)
C = #4 (fourth note down)
Dropping The 2nd
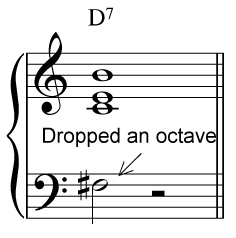
Now the drop 2 chord voicing technique involves dropping the 2nd note from the top down an octave. So, this means that you ‘drop’ the F# down one octave. A couple of points:
- We are still only using four notes in our chord. We are not adding notes.
- The ‘dropped’ note does not mean that we are dropping it from the chord. Just dropping it down an octave from where it currently is.
- You would play this dropped note with your left hand, or break up the four notes between the hands.
Take a look at example 4 to see what this looks like:
Drop 2 Chord Technique
So here in example 5 we have the first four measures with each chord using the drop 2 technique. Bear in mind that we are only focusing on the drop 2 technique. We can add more re-harmonization and “fills” between the chords at a later time.
I would suggest spending some time with this and download the pdf sheet music of this article to take back to the piano.
Fuller Chord Voicings
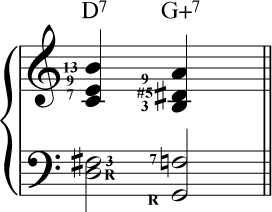
So if you played example 5, you’ll hear that the chords sound really nice, but maybe a bit “thin” because the root of the chord is missing. Well, if we add the root to the chord, we get a much fuller chord sound. See example 6:
Finally, in example 7, we can see how using our drop 2 technique along with the added root gives us a beautiful, rich chord sound that is pretty easy to achieve if you follow the steps I have outlined in this article.


